

How To Use Blob Service Sas Url To Download File
You may find yourself in demand of a cheap yet efficient solution to shop your files at some point, but where do you find that solution? Look into Microsoft Azure's Binary Big Object (blob) storage! Blob storage is one of the Azure storage services and lets you store large amounts of text and binary information files, streaming content, or even static content for distribution.
In this tutorial, y'all'll learn how to work with blob storage in Azure by walking through some mutual examples.
Read on to jump in!
Prerequisites
This tutorial will be a hands-on demonstration. If you'd like to follow along, be certain you have the following installed and available.
- PowerShell seven installed.
- Az PowerShell Module installed into your PowerShell 7 surround.
- AzCopy Executable downloaded and attainable.
- Azure Subscription – There are multiple ways to use specific Azure Resource for piffling to no price.
Building an Azure Surroundings
Before using hulk storage to store your files, you'll first need to import PowerShell Core modules, connect with your Azure Subscription, and build an Azure environment.
one. Launch PowerShell 7 and run the following control to import modules you'll be using to store files in blob storage.

# Az.Accounts - Provides credential management cmdlets # Az.Resources - Provides cmdlets to work with the elevation-level Azure resource providers, # like subscriptions # Az.Storage - Provides the cmdlets that will help y'all work with # different storage resources, similar blobs Import-Module Az.Accounts, Az.Resources, Az.Storage 2. Next, log in to your Azure Active Directory (Advert) tenant, then run the command below to consummate an interactive authentication in your spider web browser, equally shown below.
Although beyond the scope of this tutorial, in that location are other authentication methods, such as a Service Master or using an access token.
Ever make certain the tenant and subscription shown afterward logging in are that which you intend to use. If needed, you may change your context.
three. At present run the below control to create a new resource group chosen demo, and appended with five random numbers (Get-Random -Maximum 99999). Resource groups are hierarchically below subscriptions and contain resources that allow for more granular direction.
Discover the -Location of the resource group is ready to Primal US for this instance. When the command completes, information technology stores the result in the $resourceGroup variable.
$resourceGroup = New-AzResourceGroup "demo$(Go-Random -Maximum 99999)" -Location 'Fundamental Us' 
iv. Run the control below to perform the following tasks and create a new Azure storage account. For this example, the storage account is named storage, and appended with five random numbers (Get-Random -Maximum 99999). The $storageAccount variable will concur the returned object after the command completes.
# Pass the -ResourceGroupName with the ResourceGroupName property # of the $resourceGroup variable you lot created in pace three. # Append random numbers to the storage account -Proper name # similar to the resources group. # Ready the same -Location equally the $resourceGroup variable'south Location holding. # Placing resource in the same region equally the parent resource group is a adept practice. # Specify the storage account name -SkuName with either # locally redundant storage (LRS) or a globally unique name within Azure. $storageAccount = New-AzStorageAccount ` -ResourceGroupName $resourceGroup.ResourceGroupName ` -Proper name storage$(Get-Random -Maximum 99999) ` -Location $resourceGroup.Location ` -SkuName Standard_LRS 
v. Execute the below command to run a couple of tasks for the Azure Ad Role assignment:
- The
-SignInNamevalue uses the business relationship you're currently logged in via theUserIDholding returned by theGo-AzAccessTokencmdlet. - The value of
-RoleDefinitionNameis the Storage Hulk Information Contributor built-in office y'all are assigning. - The
-Scopevalue sets the telescopic of the function assignment for the storage account you created (storage10029 shown below) via the$storageAccountvariable'sIdproperty.
You lot tin always provide more granular role assignments to individual containers as necessary.
New-AzRoleAssignment ` -SignInName (Get-AzAccessToken).UserId` -RoleDefinitionName "Storage Blob Data Contributor"` -Scope $storageAccount.Id 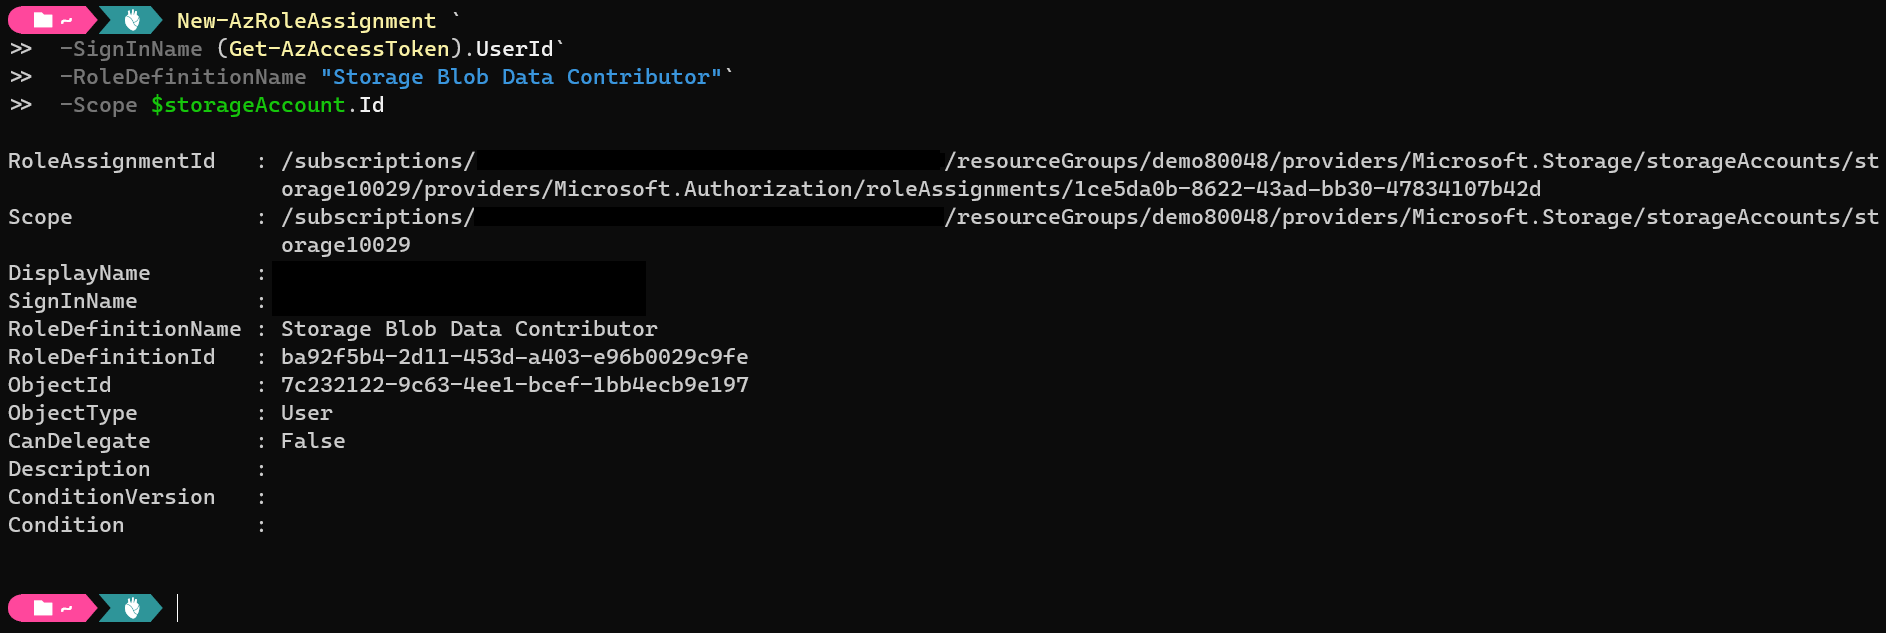
six. Finally, run the series of commands below to create a file chosen temp.dat on your local system. You'll exist uploading and downloading this file from the storage account in the following sections to demonstrate how blob storage works.
# Load the FileStream .Internet Grade $file = New-Object System.IO.FileStream .\temp.dat,Create,ReadWrite # Set the size of the file $file.SetLength(10MB) # Close the handle $file.Close() # Lookup the file to confirm the size (Go-ChildItem $file.Proper noun).Length 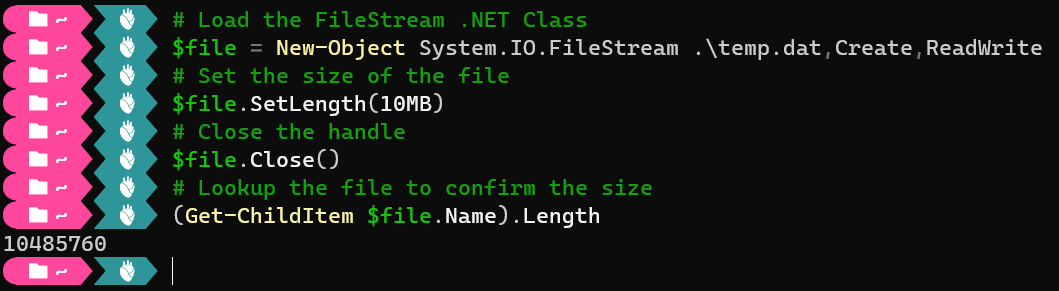
Uploading Files via PowerShell
At present that y'all take built an Azure environment and created a sample file permit's start uploading the file to blob storage. Blob storage works differently than standard filesystems. Each file in the hulk storage is an object and kept within containers.
The cadre functionality of blobs is similar to other filesystems, merely there are use cases where either could be a better solution. Blobs can fifty-fifty back virtual filesystems (e.g., BlobFuse).
Microsoft offers multiple methods to upload files to your storage accounts via PowerShell, AzCopy, and Azure Portal. But let'southward upload the sample file (temp.dat) to blob storage via PowerShell for a first. PowerShell allows you a consistent feel to work with your Azure Storage Accounts.
The required actions to perform this demo will incur costs. Monitor your consumption and delete resources when y'all no longer intend to use them.
Run the commands below to create a new container and upload the temp.dat file ($file) as an object. The container is named demo for this example, only you tin can name it differently as you prefer.
# Creates a container within $storageAccount via Context belongings of the storage account # The returned object is then passed to the $container variable $container = New-AzStorageContainer -Name demo -Context $storageAccount.Context # Uploads the temp.dat file ($file) to the demo container ($container) # The hulk proper name (-Blob) volition utilize the same name of the file you lot're uploading (Get-ChildItem $file.Proper name) Set-AzStorageBlobContent -File $file.Name -Container $container.Name -Blob (Go-ChildItem $file.Name).Proper noun -Context $storageAccount.Context 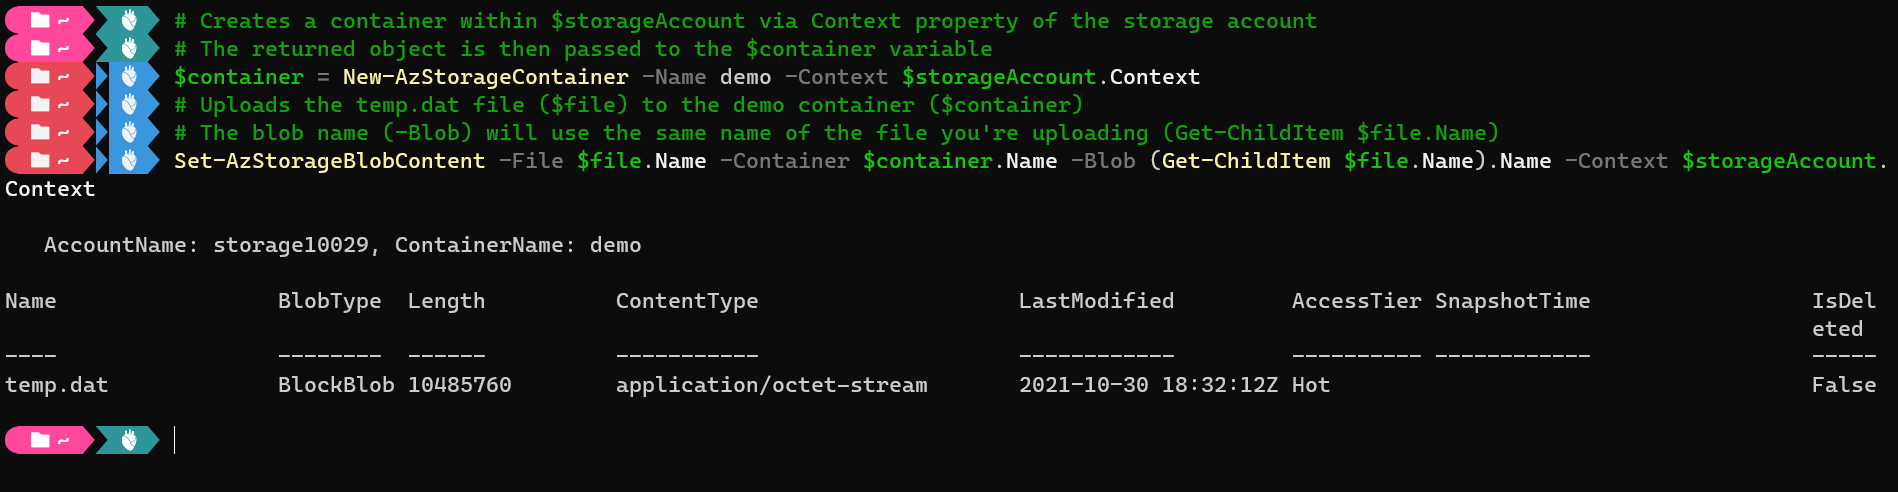
Uploading Files via AzCopy
Perhaps you lot have more circuitous use cases, such as synchronizing content or copying content between dissimilar accounts at scale. If so, the AzCopy control-line tool is what you need.
Run the commands below to login to your Azure tenant and copy your local file ($file) to the URL endpoint of your container. Yous're logging in to Azure tenant since AzCopy is not enlightened of the credentials yous are using with PowerShell.
# Login to the Azure tenant & .\azcopy.exe login # Copy the local $file to the full URI of the destination $container & .\azcopy.exe copy $file.Name $container.CloudBlobContainer.Uri.AbsoluteUri 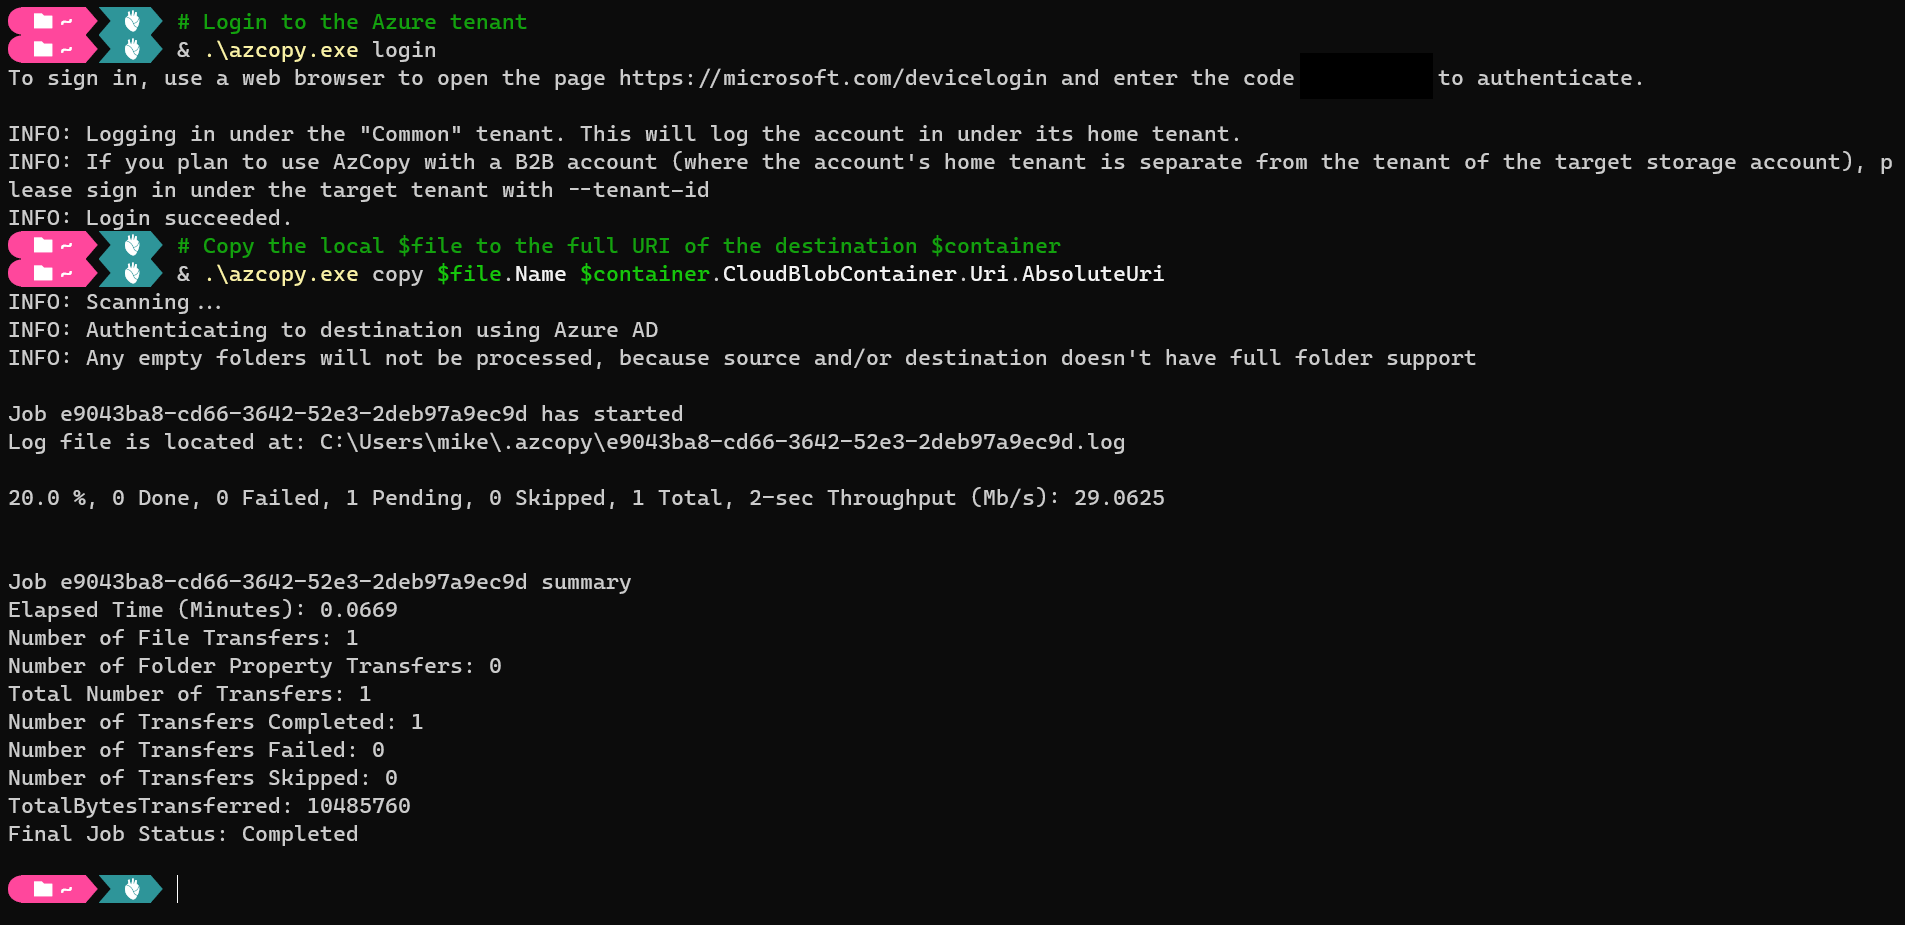
Instead of uploading, perhaps yous want to download files via AzCopy. If so, run the command below to
copythe specified files (temp.dat) from your container to the current local directory:& .\azopy.exe re-create "$($container.CloudBlobContainer.Uri.AbsoluteUri)/temp.dat" .\temp.dat
Uploading Files via Azure Portal
If you prefer a GUI method of uploading your files, then Azure Storage Explorer is your friend. Azure Storage Explorer is 1 of the best graphical methods to manage your blob storage. You can access the storage explorer from your storage account resource in the Azure Portal.
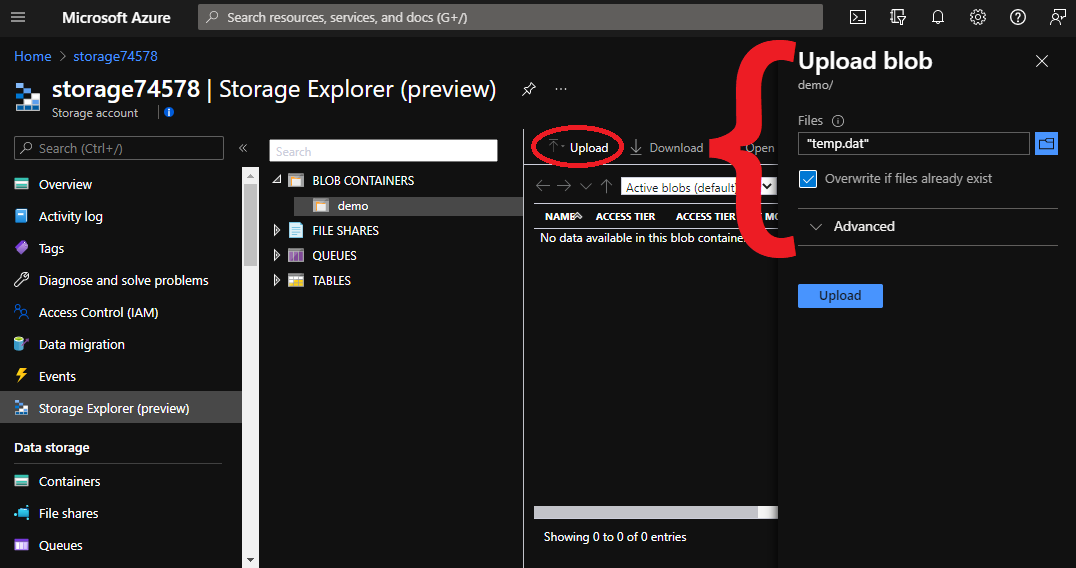
1. Open your favorite web browser, and navigate to your Storage Explorer in Azure Portal.
ii. Click on the demo container nether Hulk CONTAINERS, every bit shown below, then click on Upload to access the Upload blob blade (right panel).
3. Now click on the folder icon at the Upload hulk panel to select which files to upload (temp.dat).
4. Finally, click Upload (blue push button) to upload your file.
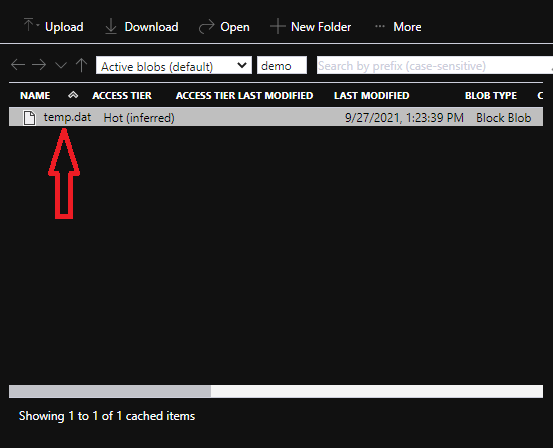
Once the upload completes, you lot can close the Upload blob blade and see your uploaded hulk, like the image below.
Downloading Files via Azure Portal
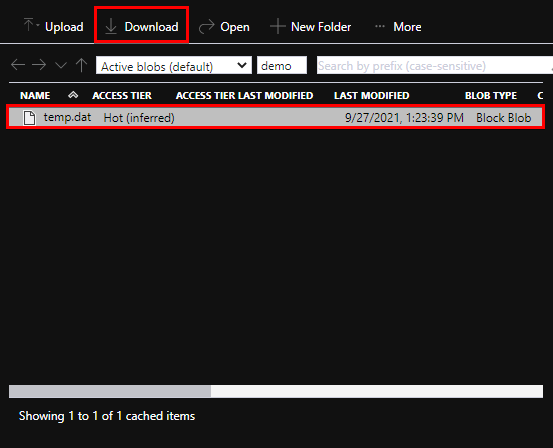
Similar to uploading content to blob storage, Azure supports downloading content in many ways. But since you lot merely uploaded a file (temp.dat) via Azure Portal, permit'south download the same file using Azure Storage Explorer in Azure Portal.
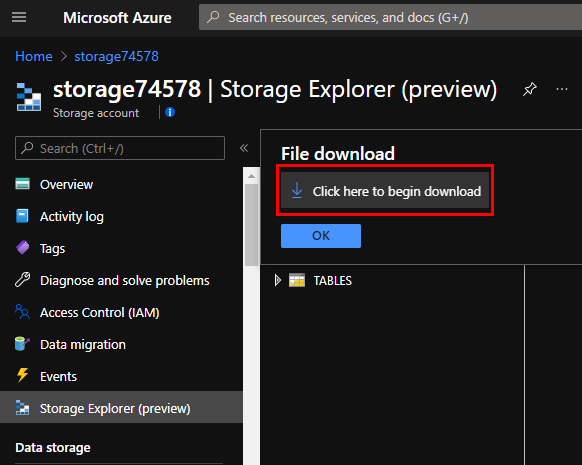
Select the file (temp.dat) to download and click on the Download button in the Azure Storage Explorer, as shown beneath. Doing so opens a new dialog box to confirm the download you'll run into in the adjacent step.
At present click on the Click here to brainstorm download push button to download the files you selected.
Downloading Files via PowerShell
Like uploading files, you also get an choice to download files from the hulk storage by running commands in PowerShell. With PowerShell, y'all can list the objects inside a container, and so download them.
Run the below commands to listing all objects in your container and download temp.dat to your local directory.
# Listing all the objects within the $container to verify the empyt container was created Get-AzStorageBlob -Container $container.Name -Context $storageAccount.Context # Download the temp.dat object from the $container Get-AzStorageBlobContent -Blob temp.dat -Container $container.Proper name -Context $storageAccount.Context 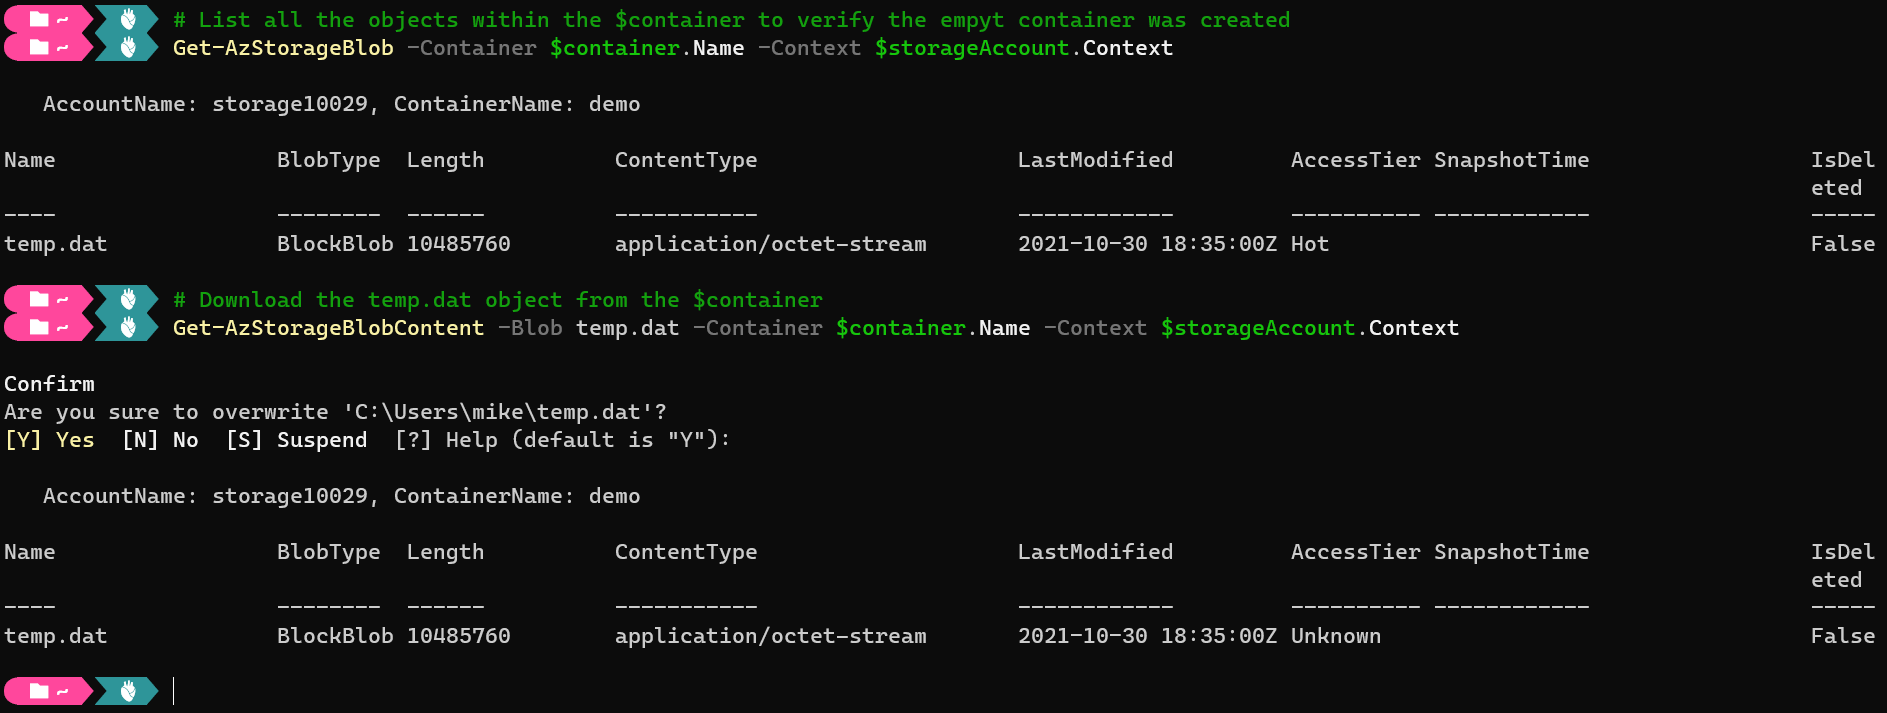
If you prefer to use short-lived unique links to download files, y'all tin can use Shared Access Signature (SAS) tokens to create a preauthorized download link. These tokens are unique and private hallmark tokens you can utilize to verify your access.
Run the commands below to create a new download link for the file (temp.dat) you want to download. The generated download link expires after 10 seconds and volition download (Invoke-WebRequest $uri) the content using that link to the $temp variable.
# Generate a new download link valid for 10 minutes $uri = New-AzStorageBlobSASToken -Context $storageAccount.Context -Container $container.Name -Blob temp.dat -Permission r -ExpiryTime (Get-Date).AddSeconds(ten) -FullUri # Use the link to download the file to the $temp variable $temp = Invoke-WebRequest $uri # Alternatively write the file to the current directory Invoke-WebRequest $uri -OutFile .\temp.dat 
Hosting a Spider web Folio on Public Net from Blob Storage
Up to this point, you've seen use cases of downloading files past authenticated users. Simply did you know that blob storage can provide an fantabulous pick for public content too? Ane example is using a blob to host your web page content, which yous'll achieve in this demo.
Even if your web page contents are encrypted both in transit and at rest, anyone can access those contents if public access is gear up.
Since yous are setting up a unlike apply case, yous'll use 1 of the major benefits of the public cloud in scale and elasticity. You can provision a new storage account for a specific use case and limit the run a risk of using public containers.
1. Run the command below to create a new storage business relationship as you did in step four of the "Building an Azure Environment" section. But this time, yous'll pass the returned object to the $publicStorageAccount variable.
$publicStorageAccount = New-AzStorageAccount -ResourceGroupName $resourceGroup.ResourceGroupName -Proper name storage$(Get-Random -Maximum 99999) -Location $resourceGroup.Location -SkuName Standard_LRS 
You now have a defended storage business relationship for your public content, and you tin configure information technology to host static web content with the following command.
two. Side by side, run the Enable-AzStorageStaticWebsite cmdlet to configure the storage account ($publicStorageAccount) for your new use case. The -IndexDocument sets the default spider web page y'all desire to present to users. The -Context will be the new storage account you lot merely created.
# Create the $spider web container and configure the storage account Enable-AzStorageStaticWebsite -IndexDocument index.html -Context $publicStorageAccount.Context 
three. Run the commands below to create a new HTML document in your current directory, and upload that certificate to the container specifically for hosting spider web content. The content blazon is set up to HTML (ContentType="text/html"), so spider web browsers can properly interpret the document.
Accessing the document on a web browser prints the Howdy from <storage account name> bulletin.
# Create a simple HTML file "<trunk><h1>Hello from $($publicStorageAccount.StorageAccountName)!</h1></body>"|Out-File .\index.html # Upload the HTML file to the static web hosting container and ready the ContentType to text/html Set-AzStorageBlobContent -File .\alphabetize.html -Container "`$spider web" -Properties @{ContentType="text/html"} -Context $publicStorageAccount.Context 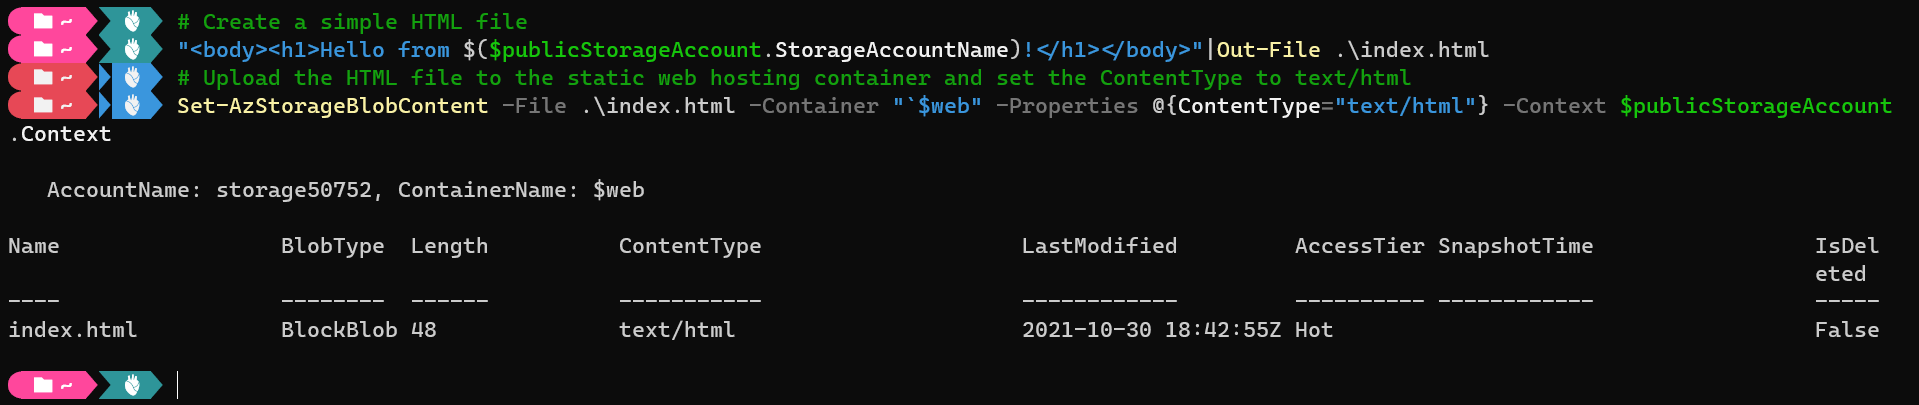
4. Now run the post-obit command to get the URL where users tin can admission your content.
$publicStorageAccount.PrimaryEndpoints.Web 
5. Finally, open the URL in your browser, yous'll see something similar to the following screenshot.

Cleaning upward Resource
Now that yous've gone through testing these new concepts in using blob storage, you will want to clean upward your resources. Why? Doing and so helps you go on your subscription make clean. More importantly, you stop incurring boosted charges.
Since all resource you lot used in this tutorial are in a single resource grouping, you tin can make clean up all resources by deleting the resource group.
Resources won't always be contained within a single resources group, which illustrates why liberal utilize of logical partitioning can exist beneficial, especially when testing or iterating frequently.
Run the Remove-AzResourceGroup cmdlet below, specifying the ResourceGroupName property of the $resourceGroup variable to delete the resource group and all resource within.
Remove-AzResourceGroup -Name $resourceGroup.ResourceGroupName 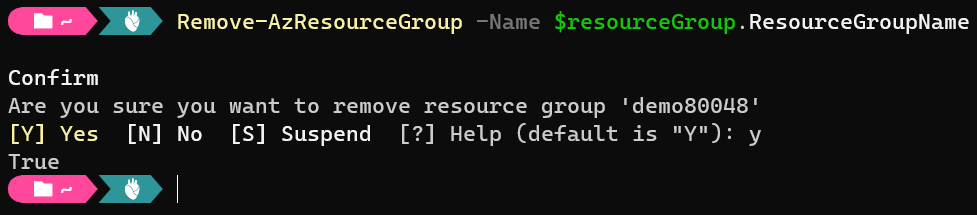
Conclusion
In this tutorial, y'all've touched on uploading and downloading files to and from blobs in cloud storage on different platforms. You've also learned information technology'due south possible to host a web page from hulk storage that users can publicly access.
You lot can do much more than with blob storage and other storage types, and so how would yous build on these concepts? Perhaps piece of work with file storage accounts, provide serverless file systems, or use page blobs for virtual hard disks with Azure virtual machines?

How To Use Blob Service Sas Url To Download File,
Source: https://adamtheautomator.com/blob-storage/
Posted by: humphreybuis1976.blogspot.com
0 Response to "How To Use Blob Service Sas Url To Download File"
Post a Comment